
Fixed Price Packages
How do Fixed Price Package Rates work?
Invite All Sorted to be your Xero Advisor
Xero Advisor Access
With Xero advisor access we are able to provide better support and more effectively manage your accounts. It also provides us with additional
functionality that can add significant value to your business. In relation to privacy, our bookkeeping agreement with you contains a confidentiality
agreement which ensures that anything we see in your accounts, stays between us.
Send a Xero advisor access invitation
To give us access to your accounts, do the following:
- Click on this this link to open the Users screen.
- Click the Invite a User button.
Note: You must be a Standard User and have Manager User access to be able to see this button
- Enter the first name and last name of your bookkeeper, along with their All Sorted email address.
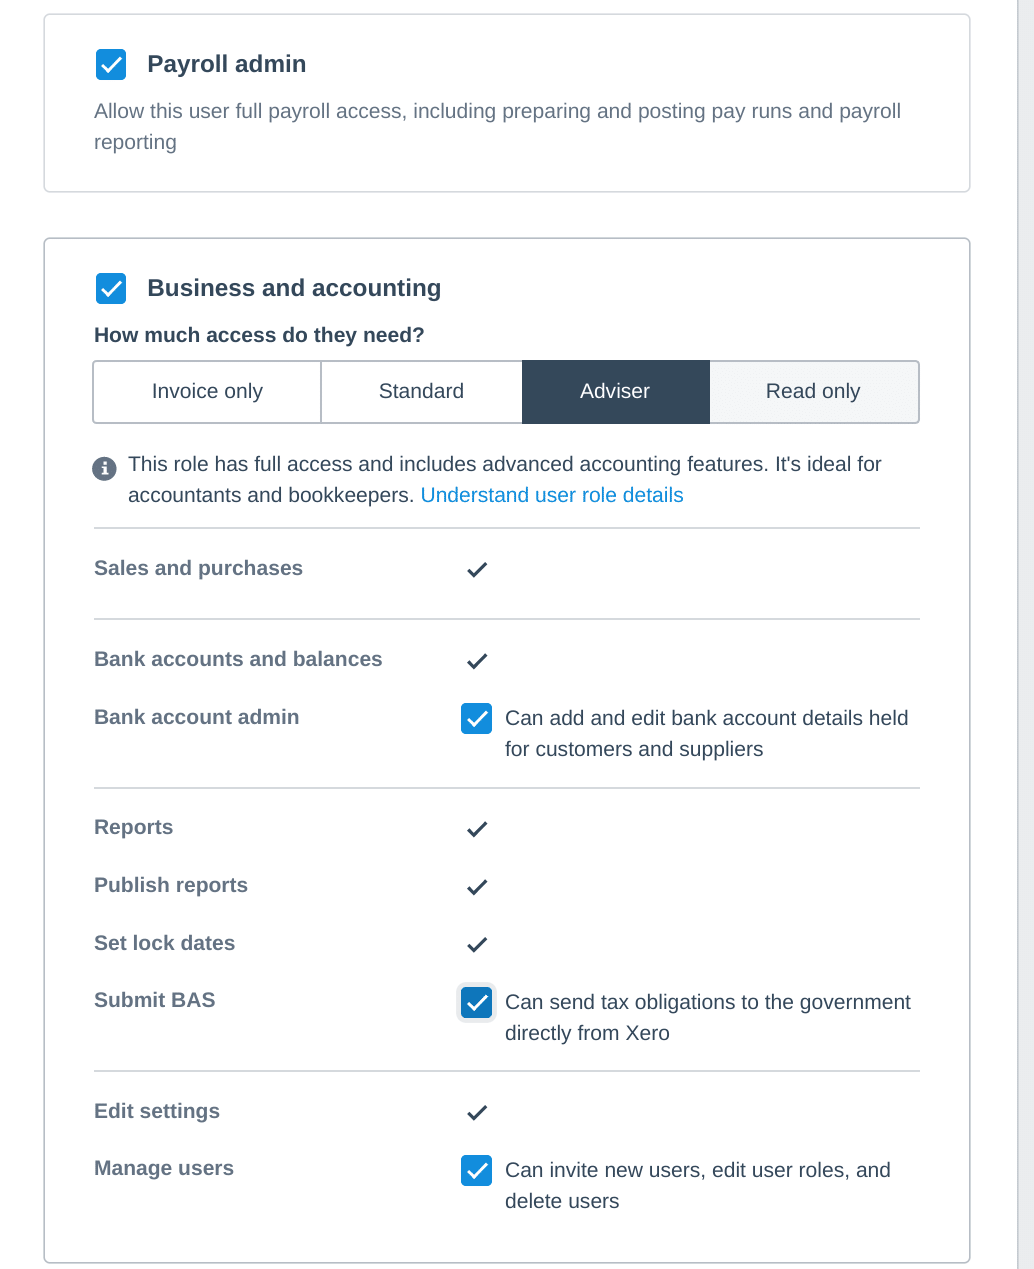
- Select the following:
- Payroll Admin checkbox
- Business and accounting check box
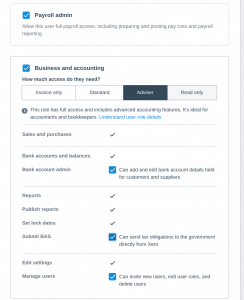
Select Adviser- Select Bank account admin check box
- Select Submit BAS check box
- Select Manage users check box
- Finally, press the Send invite button
For more help granting Xero advisor access, view this video. If you do not have access to add users to you account, you should ask whoever is the subscriber for user access. If your accountant is the subscriber to your Xero file, you should ask for the subscription to you be transferred to you. See Accounting's dirty little secret.
Authorise Xero Auto Super Batch Payment
Once your bookkeeper has prepared your Superannuation batch payment a Xero Auto Super transaction will be created. We will let you know that we have prepared your Auto Super payment, however, you will also receive an SMS from Xero with an approval code.
When your receive the SMS do the following:
- Click on the Superannuation tab on the Payroll Menu
- Click on the Batch payment that is in a Pending Approval state
- Review the list of payments included in the batch payment
- Ensure that you have enough funds in your nominated bank account, as Xero will deduct this amount from your account once the transaction is approved.
- If you notice any errors, contact your bookkeeper
- If everything is ok, click Approve & Submit, then enter the authorisation code you received in the SMS
- The status of the batch payment will change to Approved
Please note that it can take up to five business days for your payment batch to reach your employees super funds.
Once the super funds receive the contributions, the status will update to Processed.
Related Knowledge base items
Adding an invoice to Xero
If you used to find invoicing time a frustrating time, things are about to change. Creating invoices in Xero is fast, detailed and easy.
You can generate invoices from the Xero dashboard, the Sales screen, directly from a quote or when you're on a contact's details screen. Copy previous invoices, set tax defaults, and attach relevant files to speed things up further.
This guide and video shows you how it's done.
If you need any help with invoicing or have any questions, please contact us via the chat bubble (below) or here
How to approve and process Xero Batch Payments
If you have bills coming in from multiple suppliers we suggest that you make payments in one single batch (called an ABA file). This helps with managing your cash flow, is the most efficient way to make the payments and it reduces the risk of errors.
How are ABA files created?
As invoices are emailed through by suppliers, they are entered into Xero with the due date noted.
Within Xero we will schedule your bills, based on the due date of the supplier's tax invoices
Every week your bookkeeper will email you a list of bills for you to approve and/or update.
Once approved, we will create a batch file (called an ABA file) that contains details of the invoices to be paid. Your bookkeeper will email you a link to this file so that you can upload it to your online banking. Your bank will process these payments in one batch.
Approving/Checking Bill Payments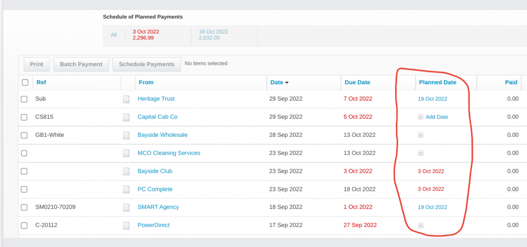
Each week your bookkeeper will email you a Xero link to bills that are due for payment in the coming week.
We ask you to review the list of bills.
If there are any bills that you wish to either not pay, or delay payment of, you can adjust the Planned Date (see example on right)
Once you have approved/updated each bill, send an email to your Bookkeeper letting them know to proceed with preparing the bill payment
Processing a Batch Payment
We normally do not make payments on behalf of our clients. Therefore, it is up to you to verify bill details prior to paying them.
Once your bookkeeper has prepared your batch payment you will receive an email with a link to the batch payment.
To make the batch payment, do the following:
- Click on the link provided by your bookkeeper to view the batch payment
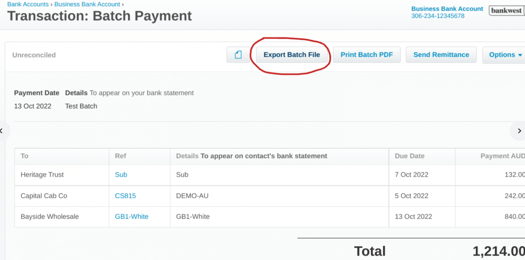
- Review the list of bills to be paid
- Once you are ready to make the payment, click on the Export Batch File button
-
-
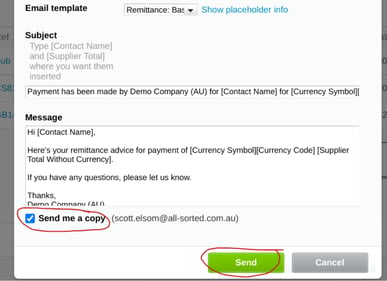
- On the Send Remittance Advice pop up, untick any suppliers that you DO NOT want to send a remittance advice to (for instance, Telstra does not require a remittance advice to be sent to them)
- When you are happy with the list of remittances to be sent off tick the Send me a Copy check box
- Click the Send buttonhe ABA file will be downloaded to your computer
-
- Log onto your online banking site and upload the file.
- Each bank has a different process for uploading ABA files, so we can't provide specific instructions for each bank. However, below are links to the major banks ABA file instructions
Sending Remittance Advices
Once you have successfully processed your payments, you should send a remittance advice to each individual supplier confirming payment. To do this do the following:
-
- Click on the Send Remittance button
-
-
What Happens Next
On the day after the payments are processed the transaction will appear in the bank feed in Xero.
Your bookkeeper will then reconcile the payment against each of the bills that were paid.
This will mark them as paid and they will then appear on any reports and on your BAS return for the period.
Onboarding a new employee to Xero
Onboarding a new employee can be a complex process, depending on your organisation. The steps below will provide your bookkeeper with all of the details that are required to get them set up in the payroll system.
There are many other HR-related processes that may be required. We have included a basic HR checklist below, however, we strongly recommend that you set up your own onboarding checklist specific to your organisation's needs.
1. Tax File Number Declaration form
You can download the ATO's most recent Tax File Number Declaration form from here.
This PDF form can either be completed online (preferred) or printed out.
Once the form has been completed and signed, it will need to be scanned and uploaded into the All Sorted onboarding Form (see Section 4 - below)
2. Super Choice Form
The Super Choice form is required for each new employee to ensure that their compulsory superannuation payments are paid to their nominated superannuation fund. You can access the ATO's most recent version here.
You will need to complete Section B prior to giving it to the new employee to complete.
Once the employee returns the form to you, you will need to complete Section C, scan the document and upload it into the All Sorted onboarding Form (see Section 4 - below)
3. Fair Work Information Statement
You are required to provide each new employee with a copy of the Fair Work Information Statement (FWIS). We recommend that as a part of your employment agreement you include an acknowledgement by the employee that they have received, read and understood the FWIS.
You can download a copy of the most recent version of the FWIS here.
The FWIS provides employees with a general overview of the National Employment Standards (NES) and conditions of employment. It contains information on:
- The National Employment Standards
- Right to request flexible working arrangements
- Modern awards
- Making agreements under the Fair Work Act 2009
- Individual flexibility arrangements
- Freedom of association and workplace rights (general protections)
- Termination of employment
- Right of entry
- The role of the Fair Work Ombudsman and the Fair Work Commission.
4. Payroll Onboarding Form
Once you have scanned the completed Tax File Number Declaration, Super Choice form and employment agreement complete this Payroll Onboarding Form. (You will require a Google account to complete the form - Click here for instructions to create one (if required)
The form will ask you to upload the following documents:
- Completed TFN Declaration Form
- Completed Super Choice form
- Completed Employment Agreement
- Scanned copy of driver's license (or other photo ID)
You will also be required to enter various personal details for the new employee. Please make sure you have the following information on hand before starting the form:
- Employee Name
- Date of Birth
- Phone
- Home Address
- Personal Email Address
- Bank account details (account name, BSB and Account number)
- Employment details
- Employment type (FT, PT, Casual, Contractor),
- Hours worked per week,
- Superannuation contribution,
- Start date,
- Salary,
- Relevant Award,
- Pay cycle (weekly, fortnightly, monthly)
- Leave entitlements
- Emergency Contact (name, relationship, phone, email)
4. Next Steps
Once submitted the system will notify your bookkeeper of the new staff member and you will receive a confirmation email confirming the details that have been entered.
Your bookkeeper will then:
- Add the employee to the payroll system
- Upload all documents to the payroll system
- Submit the TFN Declaration and Super Choice form to the ATO
- Send a Xero invitation to the new employee so they can make leave requests, check leave balances and monitor their pays
5. Other Non-payroll items
Depending on your organisation there may be a number of other non-payroll onboarding tasks that are required. These may include:
- Verify eligibility to work (work visa, age, etc.)
- Employment agreement signed and returned
- Provide employee with employee handbooks
- Review company policies (signed and returned). Examples include:
- Email use
- Internet use
- Social media use policy
- Alcohol use at company events
- Attendance
- Charitable donations
- Code of conduct
- Computer and network use
- Confidential information – classification/handling
- Conflict of interest
- Dress code
- Non-disclosure agreements
- IT Requirements
- System logons
- Computer/phone set up
- Desk allocation
- Company email address
- Software purchase/access
- Socialisation
- Announcement email
- Team introductions
- Inductions/Training